


In a rush? Jump straight to the thick and creamy yogurt recipe! Or learn how to make Greek yogurt.
I struggle to eat healthily and get enough exercise on a regular basis. In my attempts to sneak more fruits into my diet, I’ve started to drink a lot more smoothies.
Most of my favorite smoothie recipes, however, require yogurt as a base. As much as I love yogurt, my family doesn’t like yogurt as much as I do. As a result, I end up eating most of the yogurt in our fridge on my own. I found that I can’t eat an entire tub of yogurt by myself, and tinier cartons of yogurt are often more expensive than bulk containers.
I realized that if I’m going to get my smoothie fix without wasting a lot of money, then I need to make my own thick and creamy yogurt. If figured that if I make my yogurt, I could control the portion sizes, the flavor, and the amount of sugar that I consume.
I purchased a Euro Cuisine yogurt maker* thinking that it would be a breeze to make the perfect batch of yogurt whenever I wanted. Just heat some milk, mix in some culture, and let the maker do the rest, right?
Not quite.
The instructions for the yogurt maker were bare bones at best. Though I followed the instructions to the letter, I often got sour, runny yogurt that made me question my love of dairy.
But if you know me, I’m a bit stubborn. When a recipe proves difficult, I don’t drop it and move to something better. I research, I tweak, and I experiment until I get it right. It’s taken me quite a few tries to perfect this yogurt, and now I can make thick and creamy yogurt every single time. I love it so much that I doubt I’ll ever go back to store-bought yogurt (unless I need a fresh culture).
Now you can reap the benefits of my hard work and make beautiful, tasty yogurt for yourself.
Things You’ll Need for Regular Yogurt
So you’ve got yourself a yogurt maker? That’s great! But it’s only the first step to making great yogurt. I’ve found that I need a whole array of tools to make thick and creamy yogurt:
- One 9″ x 13″ Rectangular Glass Casserole Dish. This is optional – I find it easier to hold steady temperatures in the oven rather than on the stovetop.
- A Double Boiler or a Heavy-Bottomed Sauce Pot. A double boiler keeps the milk from burning on the bottom, but any sauce pot will do in a pinch.
- A Probe Thermometer. This is essential. You need to keep a close eye on temperatures.
- A Fine Mesh Strainer or Colander with a Cheesecloth. This is to strain the skin after putting the milk in the oven.
- A Small Mixing Bowl or Container. It needs to be big enough to whisk about 8 ounces of milk.
- A Medium Mixing Bowl or Container. It doesn’t need to be fancy, but it does need to hold 42 ounces of milk.
- A Large Mixing Bowl or Container. It needs to be large enough to hold the medium mixing bowl along with ice water.
- A Wire or Silicone Whisk. You need to stir the milk constantly on the stove or your milk will burn.
- A Funnel. If you have a steady hand, you don’t need a funnel. But funnels definitely make the job easier.
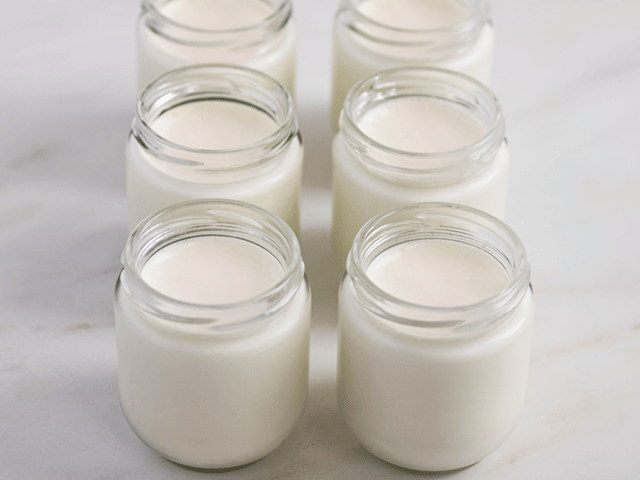
And of course, don’t forget the Euro Cuisine Yogurt Maker along with 7 glass yogurt jars. Or, if you have something similar, go for it.
My Favorite Yogurt Recipe
Thick ‘n’ Creamy Yogurt with Euro Cuisine
Ingredients
Method
- Pre-heat the 9"x13" glass casserole dish inside the oven at 180° Fahrenheit (82° Celsius).
- In a double boiler, bring 42 ounces whole milk to 180° Fahrenheit (82° Celsius), whisking regularly. *
- Transfer the milk to the oven and let sit at 180° Fahrenheit (82° Celsius) for 30 minutes.
- Remove milk from oven and use a fine mesh strainer and bowl to strain the skin.
- Rapid cool the milk to 100° Fahrenheit (37° Celsius). I prefer to submerge the medium mixing bowl into a larger mixing bowl holding ice water. Whisk consistently while the temperature cools.
- Remove the container from the ice bath to keep it from dropping lower than 95° Fahrenheit (35° Celsius).
- Pour a about 1 cup of the milk into a small mixing bowl. Whisk 1 tablespoon of the Unflavored Fage Greek Yogurt into the milk until the yogurt dissolves completely. Pour the mixture back into the rest of the milk and whisk thoroughly.
- Use a funnel to divide the milk evenly among the 7 glass yogurt jars.
- Place the yogurt jars in the Euro Cuisine Yogurt Maker – do not include their individual lids.
- Add the lid to the Euro Cuisine maker and turn on the switch – the maker will light up.
- Let the yogurt incubate undisturbed for 10 hours. Ensure the maker is in a place where it won't be jostled and the temperature remains fairly even.
- Remove the Euro Cuisine lid and put the smaller lids on the individual jars.
- Place the yogurt in the fridge and chill for at least 4 hours before serving, preferably longer.
- Enjoy!
- Follow all the instructions for the unflavored yogurt until steps 7.
- Pour 6 ounces of milk mixture into one of the jars (I prefer the jar in the middle because that's easier to remember). This jar will remain unflavored for your next yogurt batch.
- In the remaining milk mixture, whisk in the Torani syrup, then divide the mixture among the jars.
- Follow the rest of the instructions for the unflavored yogurt.
Notes
What About Greek Yogurt?
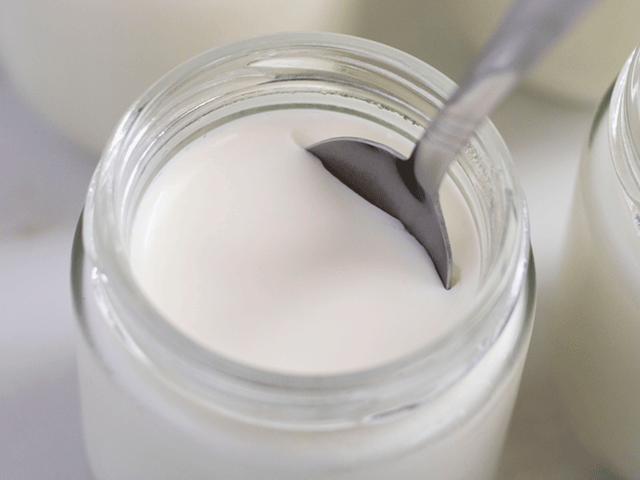
Greek Yogurt is especially thick and creamy yogurt. It tends to be more expensive than regular yogurt, and it’s definitely more indulgent and decadent than its regular counterpart. I personally love using Fage Greek Style yogurt as a culture for my own homemade yogurt.
I intentionally made my thick and creamy yogurt thick enough to hold up a spoon, so I wouldn’t have to strain each individual jar to achieve the desired consistency. But some days, I crave Greek style yogurt, and fortunately, the Euro Cuisine Yogurt Maker has me covered.
To make Greek style yogurt, you need to have a reliable way to strain the excess whey. Although you could take the time to strain each individual jar to make single-serve Greek yogurt containers, that method takes more energy and effort than I have most days.
So, I’ve come up with an alternative method for making Greek yogurt in the Euro Cuisine Yogurt maker. Rather than 7 individual jars, I use one solid glass container that I already had on hand. If you have a heat-friendly glass container that fits in your Euro Cuisine maker, then you can make Greek yogurt, too.
Things You’ll Need for Greek Yogurt
Greek Yogurt requires many of the same items as regular thick and creamy yogurt, with a few exceptions:
- One 9″ x 13″ Rectangular Glass Casserole Dish. This is optional – I find it easier to hold steady temperatures in the oven rather than on the stovetop.
- A Double Boiler or a Heavy-Bottomed Sauce Pot. I find a double boiler keeps the milk from burning on the bottom.
- A Probe Thermometer. This is essential. You need to keep a close eye on temperatures.
- A Fine Mesh Strainer. For straining the skin off the milk.
- A Small Mixing Bowl or Container. It needs to be big enough to whisk about 8 ounces of milk.
- A Medium Mixing Bowl or Container. It doesn’t need to be fancy, but it does need to hold 42 ounces of milk.
- A Large Mixing Bowl or Container. It needs to be large enough to hold the medium mixing bowl along with ice water.
- A Wire or Silicone Whisk. You need to stir the milk constantly on the stove or your milk will burn.
- A Eurocuisine Yogurt Maker. This is the brand I use – if you have something similar, go for it.
- A 32-Ounce Glass Container. This is the biggest size of single container that I managed to fit inside my yogurt maker.
- A Colander with a Cheesecloth. For straining the whey after incubation.
- A Medium Mixing Bowl or Container. This second bowl is optional. You only need this if you wish to use the strained whey to make more Greek Yogurt.
If you’re resourceful, you don’t have to use all of these items exactly. For example, if you can keep a consistent temperature on your stove, you don’t need the casserole dish to put the milk in the oven. Similarly, if you don’t have a heavy bottomed sauce pot, a regular pot will do just fine if you can whisk the milk enough to keep it from burning on the bottom.

Thick ‘N’ Creamy Greek Yogurt with Euro Cuisine
Ingredients
Method
- Pre-heat the 8"x8" glass casserole dish inside the oven at 180° Fahrenheit (82° Celsius).
- In a double boiler, bring 32 ounces whole milk to 180° Fahrenheit (82° Celsius), whisking regularly. *
- Transfer the milk to the oven and let sit at 180° Fahrenheit (82° Celsius) for 30 minutes.
- Remove milk from oven and use a fine mesh strainer to strain the skin into a bowl.
- Rapid cool the milk to 100° Fahrenheit (37° Celsius). I like to submerge the medium container into a larger container containing ice water. Whisk consistently while the temperature cools.
- Remove the container from the ice bath to keep it from dropping lower than 95° Fahrenheit (35° Celsius).
- Pour a small portion of the milk into a small mixing bowl. Whisk 2 teaspoons of the Unflavored Fage Greek Yogurt into the small amount of milk until the yogurt dissolves completely. Pour the mixture back into the rest of the milk and whisk thoroughly.
- Pour the milk into a 32-ounce glass container (I found this was the biggest size of container that I could comfortably fit inside my EuroCuisine maker on its own).
- Place the glass container in the Eurocuisine – do not include its individual lid.
- Add the lid to the Eurocuisine maker and turn on the switch – the maker will light up.
- Let the yogurt incubate undisturbed for 10 hours. Make sure the maker is in a place where it won't be jostled and the temperature remains fairly even.
- Remove the EuroCuisine maker lid and put lid on the glass container.
- Place the yogurt in the fridge and chill for at least 8 hours, preferably over night.
- Remove the yogurt from the fridge and set aside some unflavored regular yogurt for making your next batch. You only need a tablespoon, but I tend to set aside a 6 ounce EuroCuisine jar since it's easy.
- Drape a cheesecloth over a colander and place it over a bowl or container.
- Place the yogurt in the cheesecloth and let strain in the fridge until yogurt reaches the desired consistency.*
- Scoop the Greek yogurt into a container with a lid and keep in the fridge until serving. Discard the whey or use it to make more yogurt.*
Notes
Troubleshooting
I ran into a lot of issues and had a lot of questions when I first started my yogurt making adventure. Here were some of the most common problems, and here are some of the answers I found along the way.
My Yogurt Is Too Sour.
Yogurt is naturally sour thanks to the fermentation process. However, this thick and creamy yogurt recipe should result in faintly sour yogurt – not super sour yogurt. If your yogurt is too sour, you may have used too much culture (resulting in faster fermentation), may have let your yogurt incubate too long or at too high of a temperature, may have used a poor culture that didn’t ferment properly, or you may have used milk that was too old.
My Yogurt Is Still Runny.
I did everything I could to ensure my recipe resulted in thick and creamy yogurt. However, you should keep in mind that homemade yogurt tends to be a little more runny than store-bought yogurt because yogurt manufacturers often add thickeners to achieve the consistency they want. If your yogurt is really runny and didn’t thicken at all, you may have used too little culture, may have cut your incubation time short, or may have incubated your yogurt at too cold of a temperature. Another possibility is that your yogurt culture has died, and you’ll need a fresh culture to create more batches.
My Yogurt Is Lumpy.
Your yogurt should have a silky smooth texture. If it has turned lumpy, you may have inconsistent temperatures to blame. Making yogurt at too high of a temperature for too long will cause the milk to separate. Additionally, yogurt doesn’t like to be jostled during incubation – if it gets bumped, it will turn lumpy. Furthermore, using a culture that contains thickeners or additives can result in unusual yogurt textures. You can save your yogurt, however. Just strain away the lumps and then whisk the yogurt smooth.
My Yogurt Is Stringy.
If your yogurt has a stringy or slimy texture, you can blame temperature control. Your yogurt maker might not hold a reliable temperature to make yogurt, in which case, it’s a manufacturing problem and you’ll want to reach out to customer support. Or, if your milk drops below 95 degrees when you add your culture, then bacteria that creates a slimy texture will be dominant. Also, if you used a non-dairy yogurt culture (such as soy yogurt), your texture will be different than if you had used pasteurized whole milk.
My Yogurt Is Grainy.
If your yogurt has a grainy texture, rather than a smooth one, you can blame a few different things. First, a culture with additives or thickeners can result in graininess, which is why I recommend Fage as a reliable base. Second, if you heat your milk too quickly, or if you don’t mix your culture thoroughly into the milk before letting it incubate, then you may end up with a grainy yogurt.
My Yogurt Is Foamy.
Yogurt should not be foamy or smell like yeast (or beer). If it does, you can bet that your batch had some cross contamination in your kitchen. Yeast from bread making or fruit fermentation (and similar recipes) can work its way into your yogurt and ruin the batch. Try to practice good kitchen hygiene and food safety and to ensure your yogurt ferments properly.
Did You Try It?
I know my process can seem a little complicated to make yogurt. If you have tips for streamlining my recipe without sacrificing consistency, please let me know in the comments below.
I also realize that thick and creamy yogurt can be a bit tricky to get right. If you’re troubleshooting your homemade yogurt and have a question about what went wrong, feel free to ask in the comments, too. I’m not an expert, but I may be able to help.
*As an Amazon associate, I do earn a small commission for qualified purchases. However, I do not get paid for my opinions, and I Euro Cuisine did not ask me to write a review or use their product. I only recommend products I genuinely use and enjoy.


I just got this yogurt maker for Christmas and want to try this. On step 3 do I pour the milk from the double boiler into the 8 X 8 pan or do I set the double boiler into the 8 X 8 pan? Thank you!!
I pour the milk from the boiler into the pan. Sorry for the confusion!
Can I use lactose free 2% milk
Hey Robin, I personally have not tried lactose free milk with this recipe, so I’m not entirely sure how it would turn out. However, I think the yogurt culture needs the milk sugar to feed on during the fermentation process. If you do try this recipe, you’ll likely need to include a sweetener of some kind like the torani syrup or maple syrup.
Thank you so much! The yogurt is delicious. I have made 3 batches, perfect from the first batch. I bought the Euro Cuisine Greek Yogurt maker separate item to make the straining easier. I also bought a 7 cup glass storage container that fit perfect in the Yogurt maker. I haven’t tried other recipes. If I use something other than Fage yogurt, do you think I will have to alter the amount of yogurt I mix in? I don’t think I have your patience to make it perfect. Thanks again for posting this.
Yay! I’m so glad it’s worked so consistently for you. That’s a very good question. I’m pretty sure the amount you use should stay the same. However, I don’t have any guarantees because I haven’t tried a ton of yogurt brands. The ones I did try (great value and kroger) worked well enough for the first batch or two, but then subsequent batches just didn’t set right (but any number of variables could have been the cause). Whatever you choose, make sure it’s unflavored so you have greater control over the results.
For what it’s worth, my experience making yogurt at home, prior to buying a yogurt maker, I learned that you want to avoid a starter that number one has flavor. Number two has pectin. You want all those yummy live cultures in your starter without the contaminants of the flavoring or pectin. My experience the fage is the best.
Thank you so much for your insight! I appreciate the tip:)
Made my first batch and it worked so well. I was shocked.
Quick question. Can I freeze some of the Fage so I can get multiple batches?
I’m so happy your first batch went so well! Thanks for sharing. As for freezing yogurt, I would actually not recommend it. Dairy products in general tend to separate strangely in the freezer and the cold temperature could kill the cultures you need to make more yogurt. If you want to make multiple batches, just set aside a small amount of each batch you make to put in your next batch.